Tutorials
How to Create a Liquidity Pool on Solana
Learn how to create a liquidity pool on Solana, set your token's initial price and make it tradable on decentralized exchanges.
On this page
Before you start
- A Solana token
- Some SOL
- A connected wallet
Understanding liquidity pools
A liquidity pool contains two assets that traders can exchange without relying on a traditional order book. For most new Solana tokens, this pair consists of your token and SOL.
Token Creator creates an Orca Whirlpool, one of the most widely used decentralized exchanges (DEXs) on Solana. Orca uses concentrated liquidity to make trading more capital efficient.
Why do you need a liquidity pool?
Creating a token does not automatically make it tradable. Until liquidity is added, other users cannot easily buy or sell your token on decentralized exchanges.
ℹ️ Important
Without liquidity, your token exists on-chain but cannot be traded efficiently.
Without a liquidity pool, your token exists on-chain but most users cannot easily buy or sell it through wallets and decentralized exchanges.
Understanding the initial price
When launching a brand-new token, you are defining its first market price.
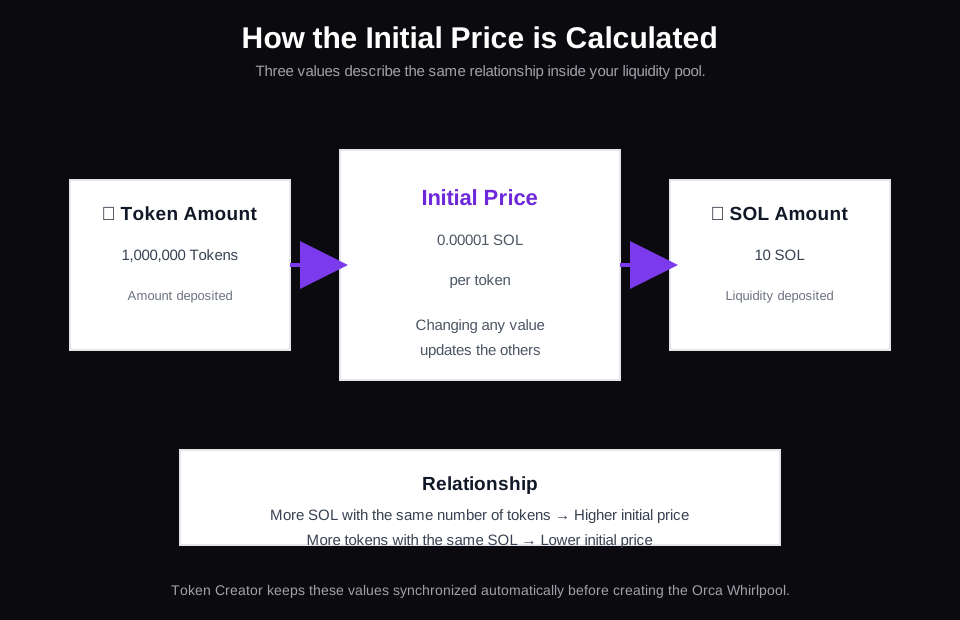
The Initial Price, Token Amount and SOL Amount all describe the same relationship. Changing one value automatically updates the others because they represent the ratio between the two assets deposited into the pool.
| Tokens | SOL | Initial Price |
|---|---|---|
| 1,000,000 | 10 | 0.00001 SOL |
| 1,000,000 | 50 | 0.00005 SOL |
| 10,000,000 | 50 | 0.000005 SOL |
ℹ️ How Token Creator works
You can edit the Initial Price, Token Amount or SOL Amount. These values stay synchronized because they all represent the same price ratio.
How much liquidity should you add?
There is no universal amount of liquidity. The right choice depends on your project, budget and launch strategy.
| Liquidity | Advantages | Trade-offs |
|---|---|---|
| Small | Lower capital required | Higher price volatility |
| Medium | Balanced launch | Requires more capital |
| Large | Lower slippage | Higher initial investment |
Adding too little liquidity increases slippage, meaning even small trades can move the market price significantly.
💡 Remember
More liquidity generally creates a better trading experience because large trades have less impact on the market price.
Avoid pricing mistakes
If this is the first liquidity pool for your token, you are free to choose its starting price.
If your token is already trading elsewhere, try to use a similar starting price. Otherwise arbitrage traders may quickly buy or sell against your pool until prices converge.
⚠️ Important
Large price differences between liquidity pools are usually corrected very quickly by arbitrage trading.
Create your liquidity pool
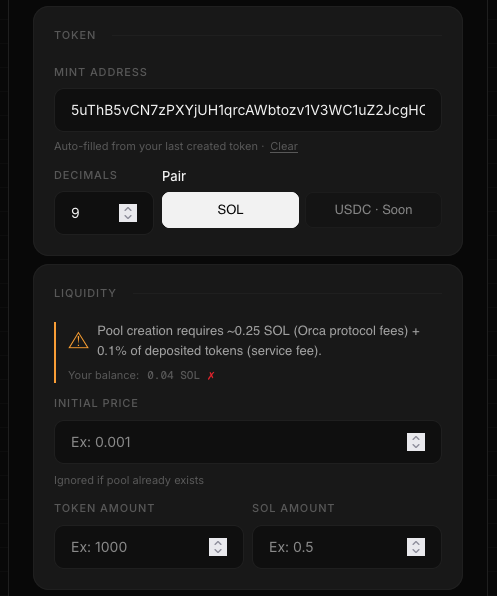
Token Creator guides you through the entire process. Select the trading pair, choose the initial price and specify how many tokens and how much SOL you want to deposit.
Currently SOL is supported.
Define the first market price of your token.
Enter the amount of tokens and SOL to deposit.
Approve the transaction to create the Orca Whirlpool.
Understanding pool creation fees
Creating a liquidity pool is more expensive than creating a token because several on-chain accounts must be initialized for the Orca Whirlpool.
Before you sign the transaction, Token Creator displays an estimate of the Orca protocol costs together with the service fee.
| Fee | Purpose |
|---|---|
| Orca protocol fees | Create the Whirlpool and required on-chain accounts. |
| 0.1% service fee | Token Creator service. |
ℹ️ One-time cost
Pool creation fees are paid only when the liquidity pool is created. Normal trading afterwards does not require paying these setup costs again.
Verify your liquidity
Once the transaction is confirmed, your token becomes tradable through the newly created Orca Whirlpool.
You can verify the pool on Solscan or by opening your token inside supported wallets and decentralized exchanges.
Common mistakes
⚠️ Avoid these mistakes
Double-check the initial price, deposited liquidity and trading pair before creating the pool. These choices determine how your token enters the market.
What's next?
Your token is now tradable. You can continue by locking team allocations with a vesting contract or sharing your token page with your community.
Frequently Asked Questions
Why can't people trade my token?
Your token needs liquidity before it can be traded efficiently on decentralized exchanges.
Can I change the initial price later?
The market price changes naturally through trading, but your initial deposits determine the starting price.
Why do I need SOL?
Most new Solana liquidity pools pair the token with SOL, allowing traders to exchange between the two assets.
Can I create a liquidity pool without coding?
Yes. Token Creator lets you create a liquidity pool directly from your browser.
Ready to launch your own token?
Create an SPL token directly on Solana in less than a minute. No coding. No custody. Everything happens on-chain from your wallet.
Create your token →Continue reading
How to Create a Solana Token
Learn how to create your own SPL Token on Solana in just a few minutes, from choosing a name to verifying it on-chain.
How to Launch a Memecoin on Solana
Learn how to launch a memecoin on Solana, from creating the token to adding liquidity and verifying everything on-chain.
What is Token Metadata?
Learn what Token Metadata is on Solana, what information it stores, and why wallets use it to display your token.
What is Mint Authority?
Learn what mint authority is on Solana, why it matters for your token, and when you should revoke it.